Building a simple form in React - before and after React 19
React 19 was just launched with a lot of new improvements to how we use forms.
I wanted to get a before and after look of how to build forms in React, so I created a simple newsletter subscribe box to showcase the differences:

Here is how the form would look like before React 19:
- the form is submitted
onSubmit - the form inputs are controlled and their values are saved in state
- loading and error states are manually handled
import { useState } from "react";
import "./newsletter.css";

const fakeSendEmail = async () => {
  return new Promise((resolve) => setTimeout(resolve, 1000));
};

const NewsletterSubscribe = () => {
  const [name, setName] = useState("");
  const [email, setEmail] = useState("");
  const [result, setResult] = useState(null);
  const [isPending, setIsPending] = useState(false);

  const handleSubmit = (e) => {
    e.preventDefault();

    if (!name || !email) {
      setResult({
        type: "error",
        message: `Please fill in your name and email.`,
      });
      return;
    }

    setIsPending(true);
    fakeSendEmail().then(() => {
      setResult({
        type: "success",
        message: `You have succesfully subscribed!`,
      });
      setName("");
      setEmail("");
      setIsPending(false);
    });
  };
  return (
    <>
      {result && <p className={`message ${result.type}`}>{result.message}</p>}
      {isPending && <p className="message loading">Loading ...</p>}
      <form onSubmit={handleSubmit}>
        <h3>Join the newsletter</h3>
        <div>
          <label htmlFor="name">Name</label>
          <input
            type="text"
            id="name"
            name="name"
            value={name}
            onChange={(e) => setName(e.target.value)}
          />
        </div>
        <div>
          <label htmlFor="email">Email</label>
          <input
            id="email"
            type="email"
            name="email"
            value={email}
            onChange={(e) => setEmail(e.target.value)}
          />
        </div>
        <div>
          <button type="submit">Subscribe</button>
        </div>
      </form>
    </>
  );
};

export default NewsletterSubscribe;
Now here is the same form with React 19
- form uses
useActionStatehook to delegate handling of the loading and error states - form is submitted with the
actionattribute instead ofonSubmit - form no longer needs controlled inputs, as the values are correctly populated (and cleared!) when we use the
actionattribute to submit
import { useActionState } from "react";
import "./newsletter.css";

const fakeSendEmail = async () => {
  return new Promise((resolve) => setTimeout(resolve, 1000));
};

const NewsletterSubscribe = () => {
  const [result, submitAction, isPending] = useActionState(
    async (previousState, formData) => {
      const email = formData.get("email");
      const name = formData.get("name");

      if (!name || !email) {
        return {
          type: "error",
          message: `Please fill in your name and email.`,
        };
      }

      await fakeSendEmail();

      return {
        type: "success",
        message: `You have succesfully subscribed!`,
      };
    },
    null
  );

  return (
    <>
      {result && <p className={`message ${result.type}`}>{result.message}</p>}
      {isPending && <p className="message loading">Loading ...</p>}
      <form action={submitAction}>
        <h3>Join the newsletter</h3>
        <div>
          <label htmlFor="name">Name</label>
          <input type="text" id="name" name="name" />
        </div>
        <div>
          <label htmlFor="email">Email</label>
          <input type="email" id="email" name="email" />
        </div>
        <div>
          <button type="submit">Subscribe</button>
        </div>
      </form>
    </>
  );
};

export default NewsletterSubscribe;
Let's go over the differences step by step.
Submit forms with the action attribute instead of onSubmit
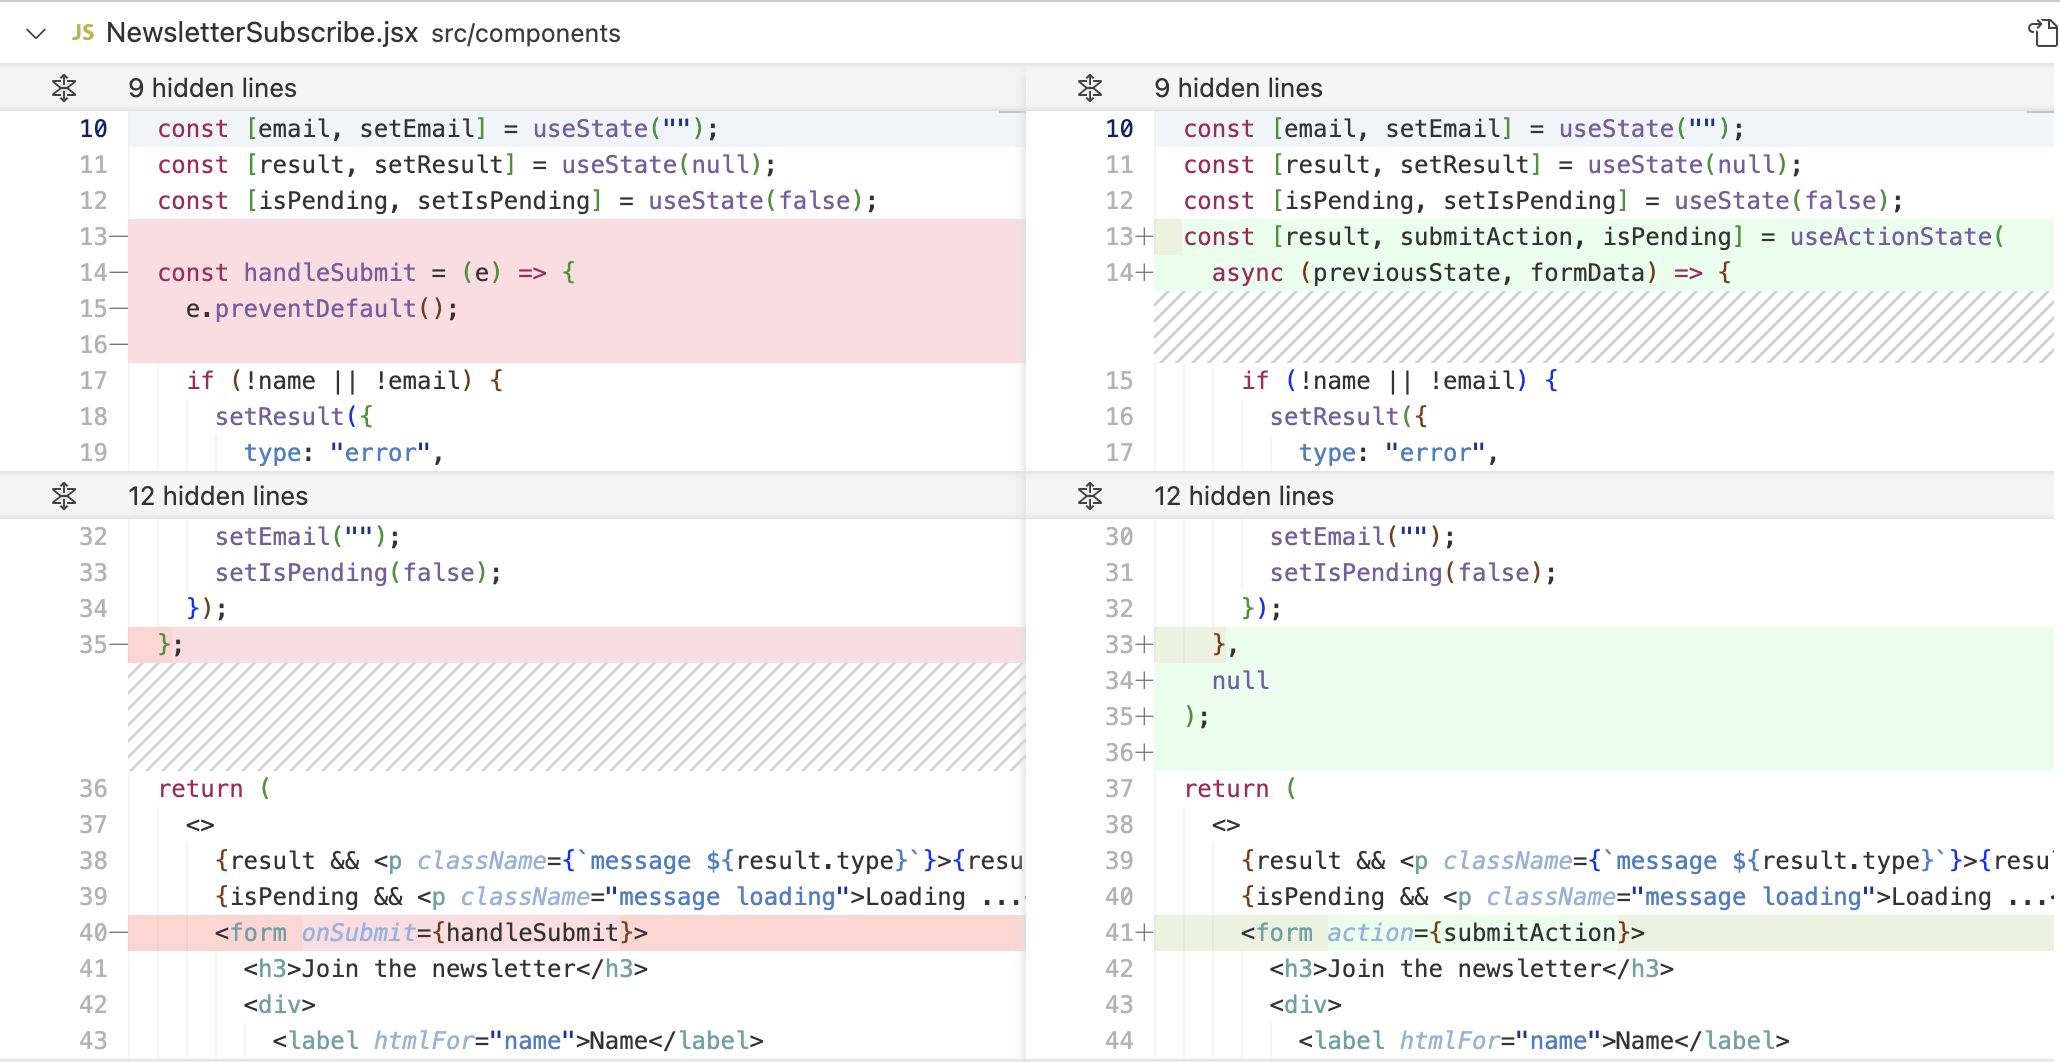
React DOM now supports <form> actions - which means you can pass functions to a form's action property and React will take care of submitting the form for you.
This is great because it means that for example, you no longer need to manually call e.preventDefault().
The useActionState hook returns the exact function you can pass to the form action- which is just a wrapped submit handler.
You can read more about the new action attribute in the official release notes: https://react.dev/blog/2024/12/05/react-19#form-actions.
Let React handle error and success states for you
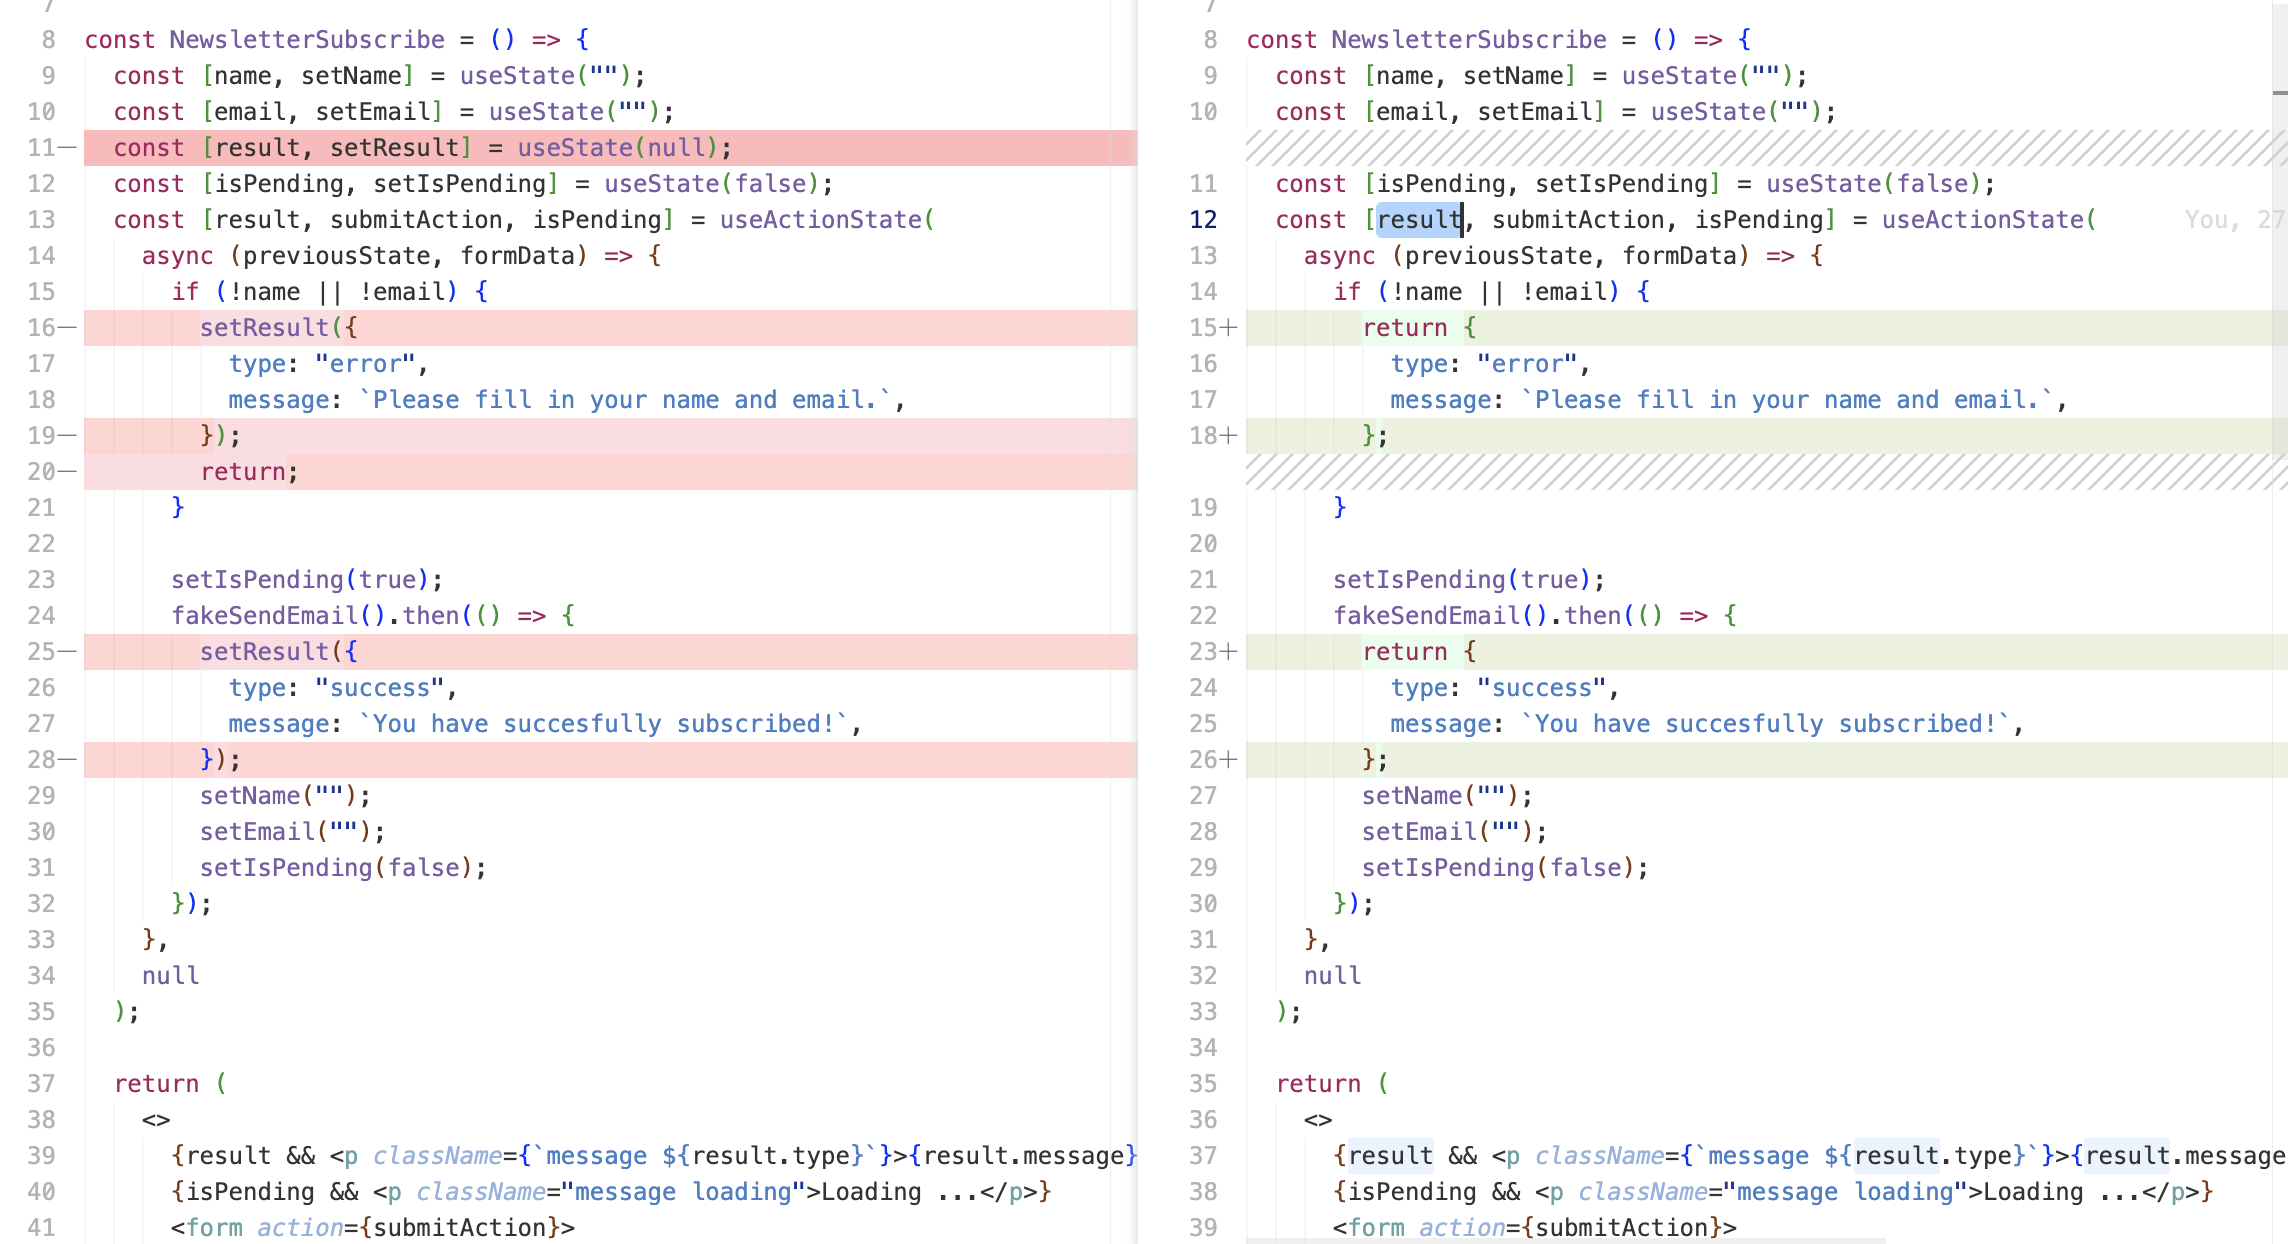
Before, we would be manually handling the success and error states after submitting a form - usually by saving them as state variables.
With the new useActionState form, you can just return the values you need, and they will be available as the first argument of the useActionState hook.
In the example below, you can see the result variable is now populated with what is returned from the submit handler:
Most examples I've seen of this feature just return the error - and that's also fine!
Check out the official release notes for more examples: https://react.dev/blog/2024/12/05/react-19#new-hook-useactionstate
Let React handle the loading state for you
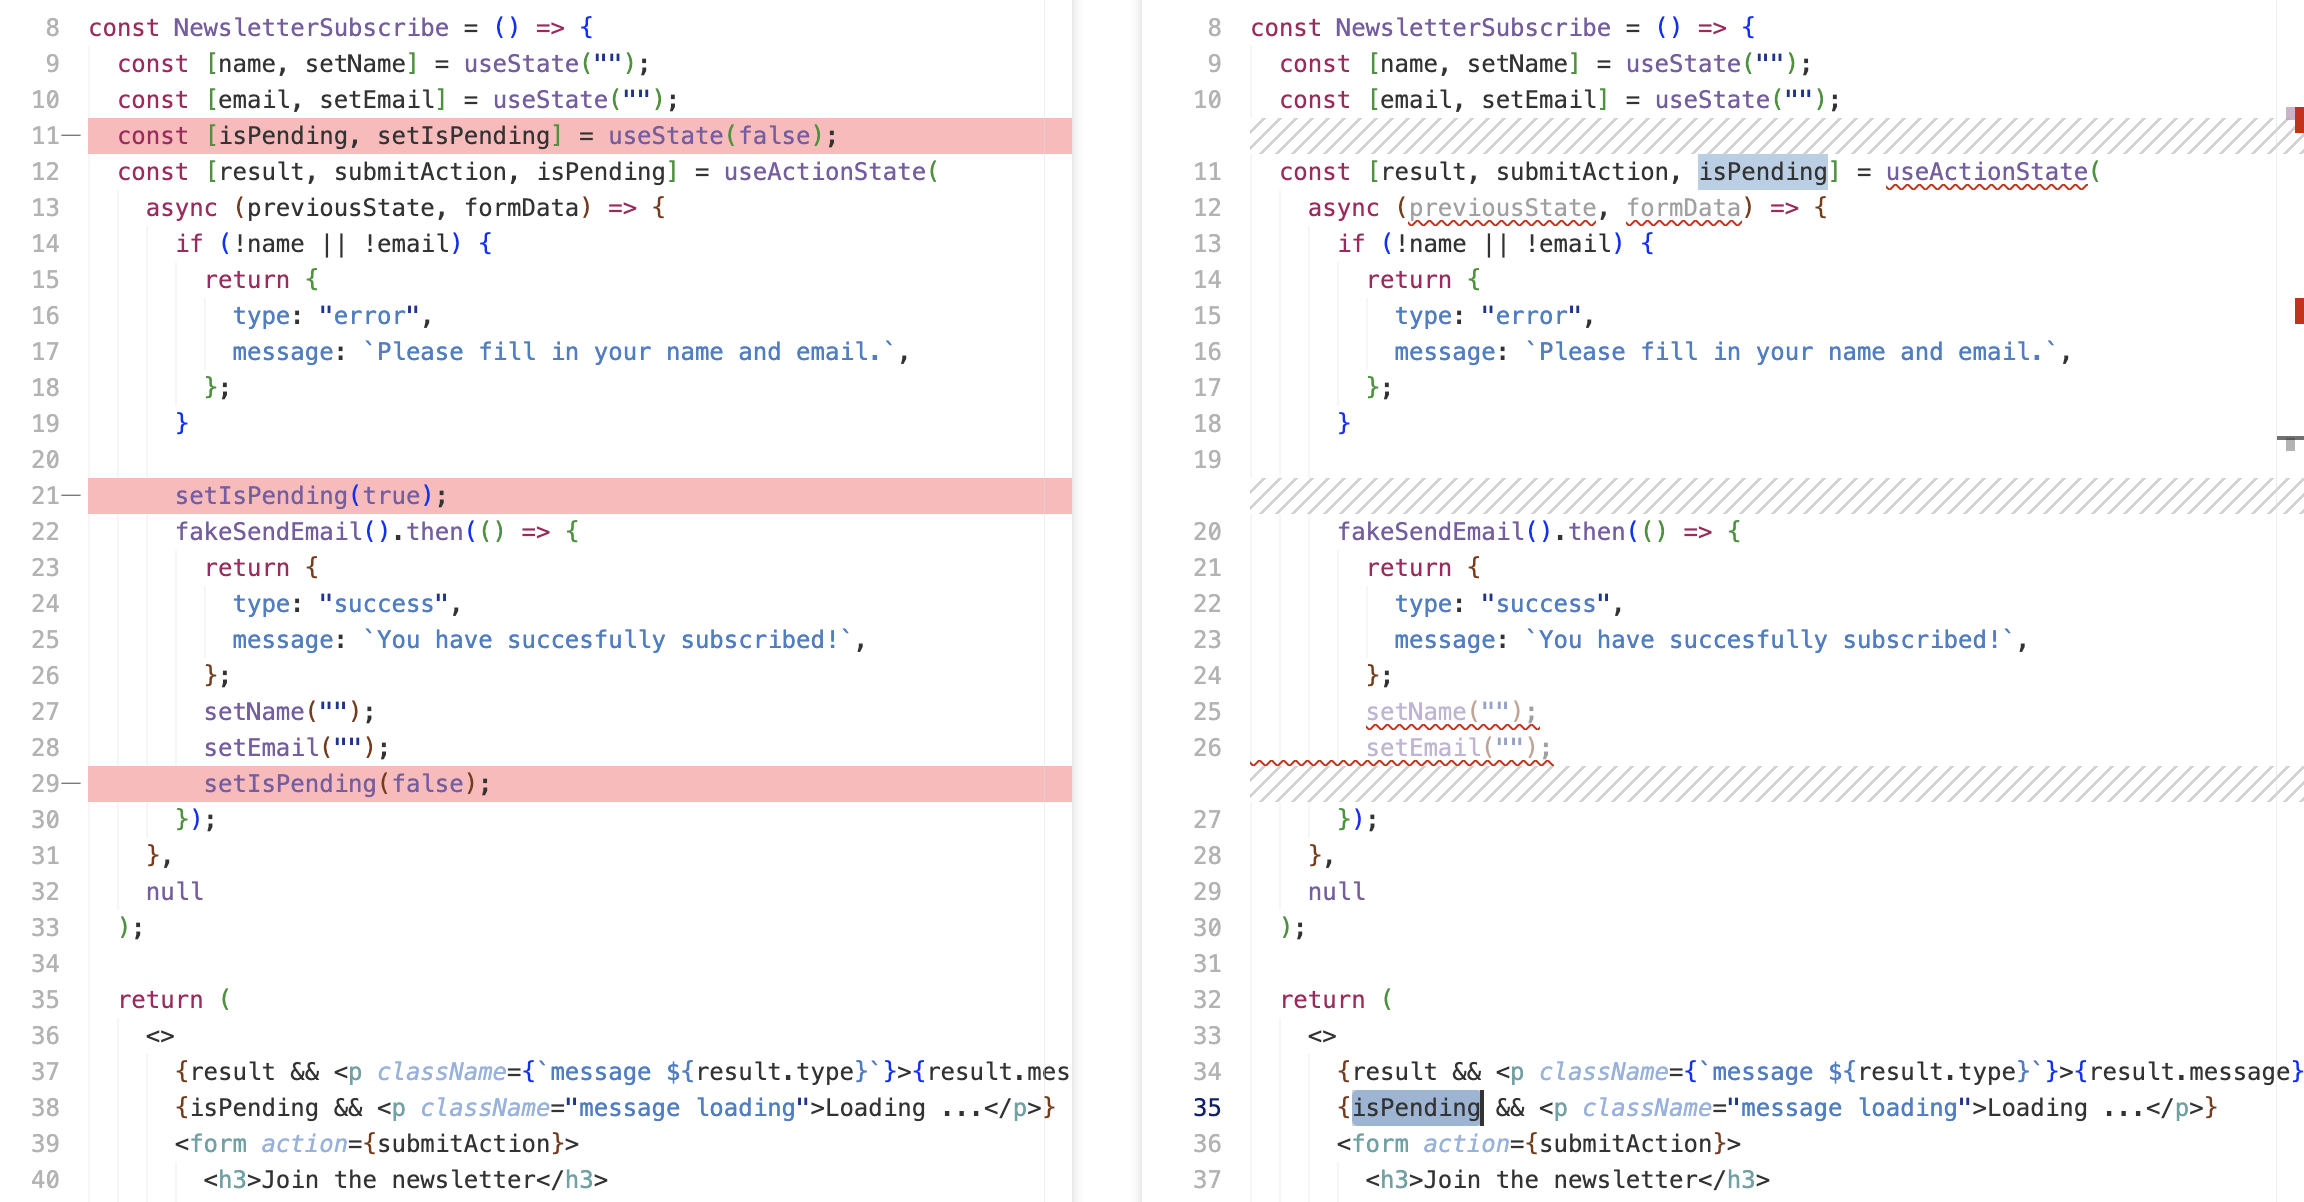
The useActionState hook returns the loading state of the form as the third argument, so you no longer need to track this manually!
Let react handle the input values state for you
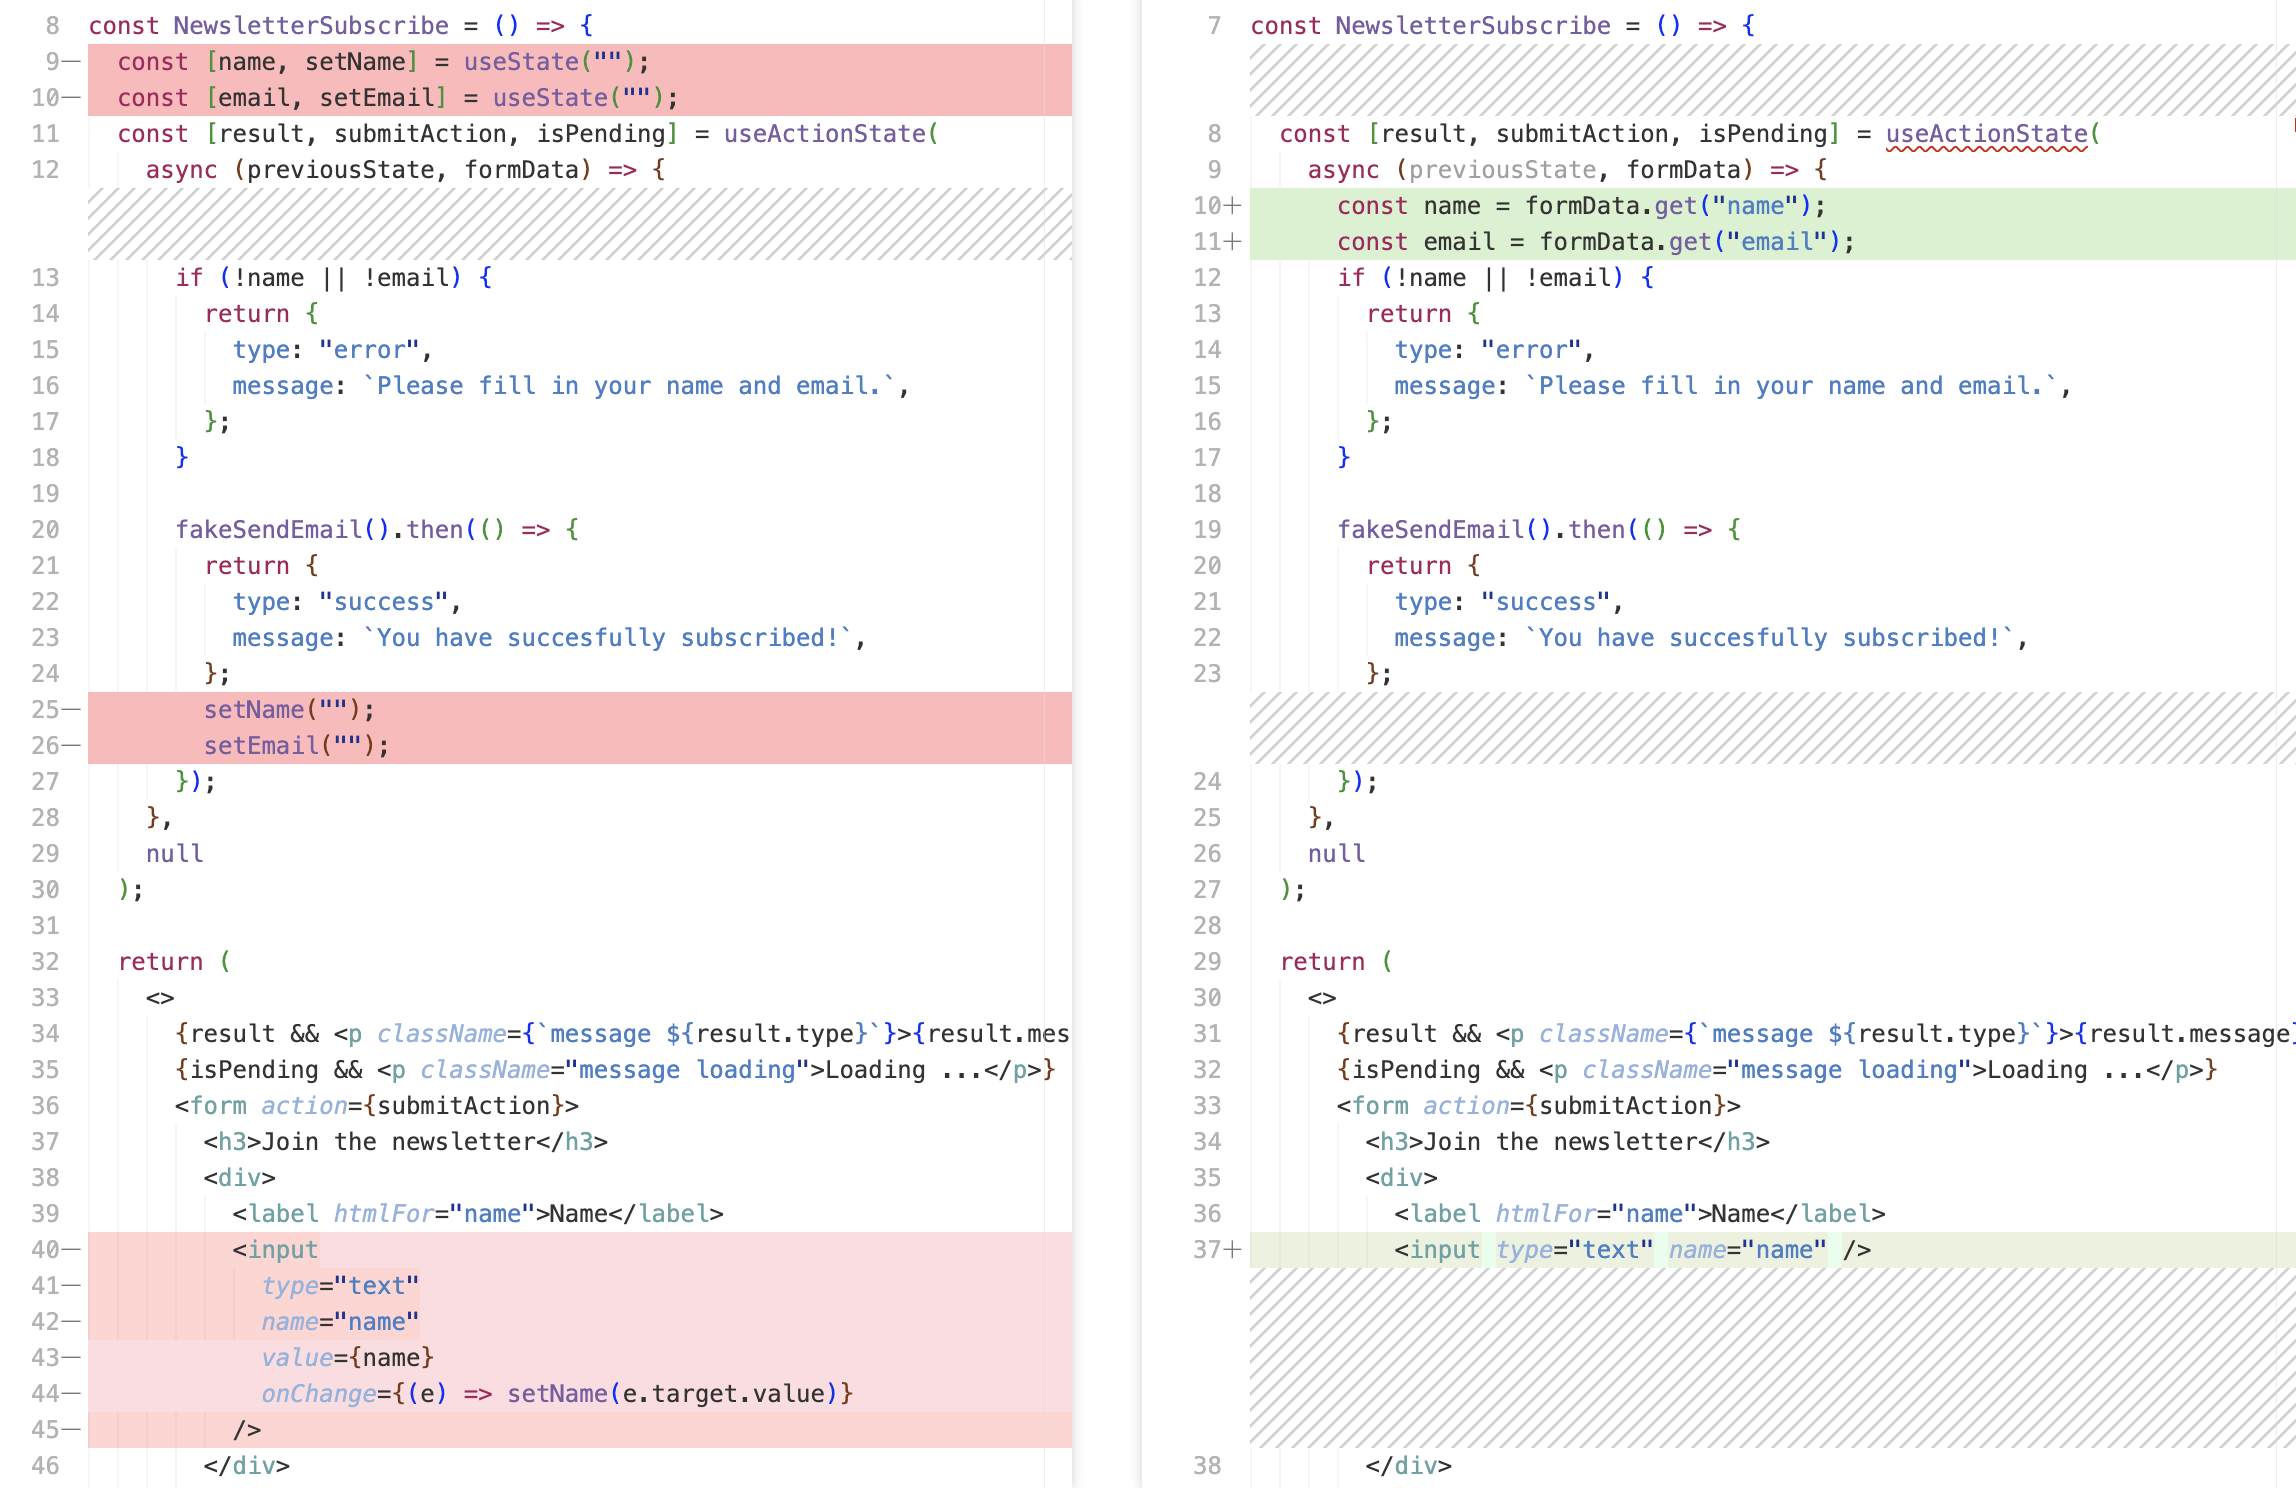
Say goodbye to controlled form inputs! When using the form action property to submit, the form values are tracked for you! In the submit handler, you can read them from the formData parameter - which uses the native FormData HTML API.
Notice how you no longer need to clear values after submit either - React does that for you (but it can be manually triggered as well if you need to with requestFormReset)
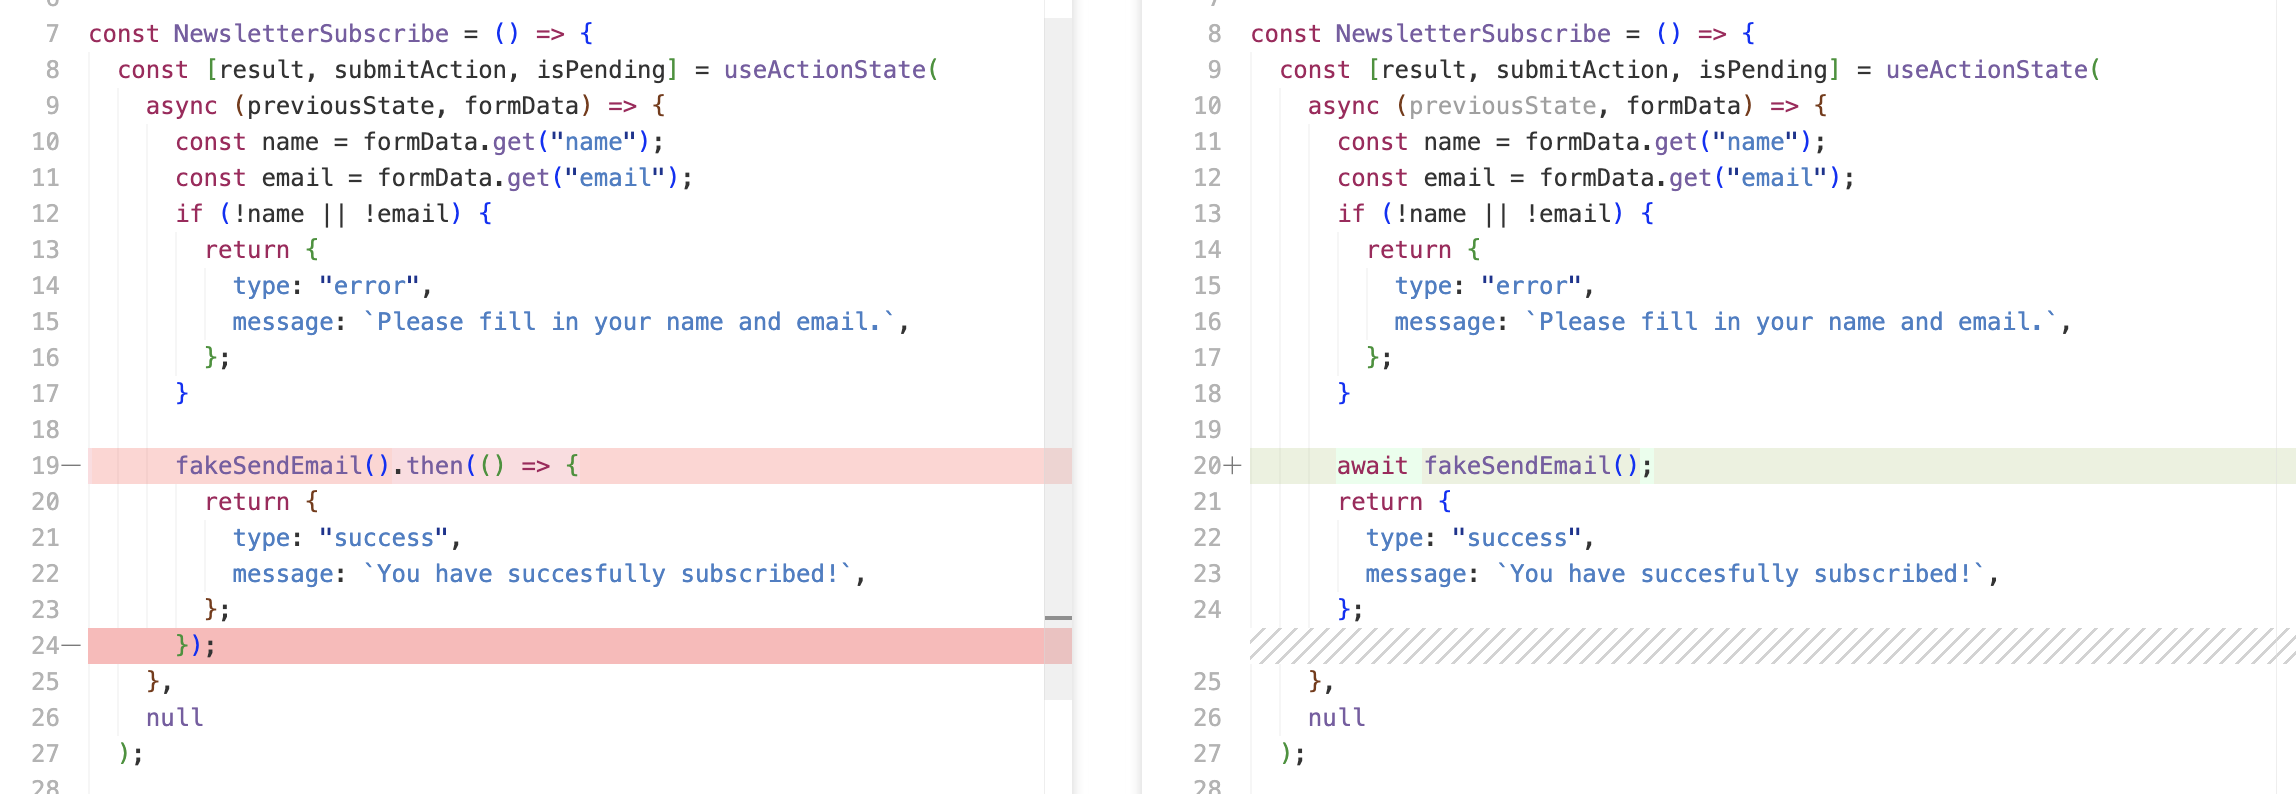
Have async submit handlers
Before, because we would use a regular event handler to submit the form, we couldn't have async functions as the submit handler. This is no longer the case, so you can use async/await as needed!
That's a wrap
Checkout the full working code over on Github: https://github.com/reactpractice-dev/newsletter-subscribe-react19
What do you think of the new React form features? Let me know in the comments below!


Member discussion